
This is a lesson and a continuation of my last post. If you haven't read it, please begin there.
It is here we find the most detail. The "snowstorm" has few particles in our way. Colors are saturated. Darks are deep. Contrasts are sharp and edges are crisp.
Now that you understand how to neutralize color, lets talk about how to implement it into your art. I'll explain it from the perspective of a landscape, but it holds true for any composition.
First off, your sky isn't usually neutralized. Its your source of light. Clouds on the other hand can often be. The sky is a whole lesson on its own, so let's pretend your sky is painted and its time to paint the other elements in your landscape. Do you start in the distance and work forward? It isn't necessary to work like this, but for this lesson, I'll explain it in this order.
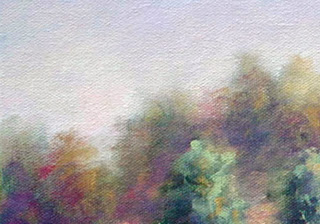
Lets start in the far distance, where trees are tiny. This is where your colors will be neutralized the most. This is where the "snowstorm's effect is heaviest", so everything about these trees will be muted, hazy and filmy. Tree edges should be loose and soft. Nothing hard and defined. Just as the color is muted, so should be your brushstroke.
If your composition has several layers, meaning subjects in varying distances from the viewer, such as background, middle ground and foreground. Make each layer gradually come into focus. Your colors should remain neutralized to a certain degree until you reach the foreground. Once you have already painted the background in very muted shades, you can add pigment to the remaining paint on your palette. So a very neutralized background yellow can be altered for the middle ground by simply adding more yellow pigment to it. Since the original mixture was already neutralized, there is no need to neutralize it again. By adding yellow, it will become less neutralized than the original and therefore it will be brighter and leap forward, by contrast.
Objects that are less neutralized will separate visually from those that are more neutralized.
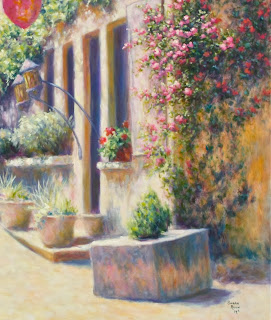
Take another look at the top photo. The treetops from the middle ground read closer to us, even though we only see a small portion of them. No perspective lines are present. It is the varying degree of neutralization that causes this effect.
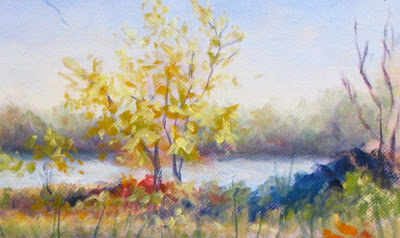
Your color saturation increases as it moves forward on your canvas and focus more defined on your objects. More detail is revealed in the middle ground, but edges are still a bit soft.
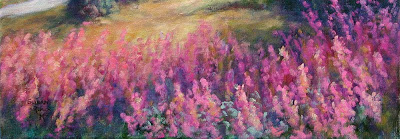
As we continue to the foreground, our colors become pure and not neutralized.
It is here we find the most detail. The "snowstorm" has few particles in our way. Colors are saturated. Darks are deep. Contrasts are sharp and edges are crisp.
When painting an open field or a vast ocean, make sure you neutralize the farthest portion and increase the amount of pigment, as you move forward. If your experiencing the problem of your field or ocean wanting to "stand-up", simply neutralize the distance and watch it lie down!
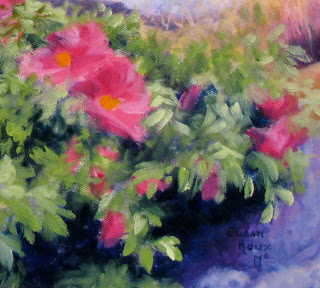
If you want an object to separate from another, don't overwork it until it turns to "mud". Take the object that is behind and neutralize its edge that is touching the forward one. This can be very helpful if painting a bouquet of flowers. At times merging objects is poetic and beautiful, but if separation is wanted, neutralization will achieve it every time.
This is also a useful tool for painting plein air on a sunny day. All the colors will appear so bright to you. Nothing will look hazy or muted. But do remember to neutralize your distance and your results will improve.
If its in the distance, neutralize!
Red, yellow and blue. The three primaries... Of course you could also neutralize by simply adding payne,s gray to everything, but please don't. Your painting will suffer from it. Red, yellow and blue. Its the ticket.
Please note that this is only a lesson on creating distance with neutralized color. Art is creative and there are many exceptions to every rule. This lesson is merely a tool. A tool that can help you define one layer from another while still achieving depth and a feeling of reality. This does not address the "focal point". Aside from everything I've written, the focal point holds the sharpest edge and the most contrast in your painting. It could be as little as a small stroke. A special small stroke to pull the viewers eye there. A juicy dot of color perhaps. Something that stands out above everything else you painted on your canvas. Also another lesson...
Some artists such as Richard Schmid will purposefully mute the foreground to hop the viewer directly to the middle ground. Time and time again you will see this technique used. There is nothing wrong with doing this. It is quite captivating. But please do note that though they are drawing you to the center of the canvas, the objects in the distance are muted...
If you want to show distance, neutralize!
susan,
ReplyDeletebeing a blogger who publish the works of my husband and son, i always read the blogs before i refer them to the original artists in my household...
reading your blog invokes in me a need to be an artist myself. i am also inspired by your posts...
you are a great teacher also...
congrats...
Nothing would please me more than to know I inspired someone to start painting by what I post on my blog...
ReplyDeletePick up that paintbrush and go have fun! You may surprise yourself.
Thank you Susan for this lesson... Bon professeur... je vous respecte... Génial... Bisous. Je reprendrai plus tard via mail avec toi...
ReplyDeleteje dois prendre d'abord..quelque leçons en anglais,
ReplyDeleteensuite je peux assimiler la leçon de peinture!
amitiés elfi
THank you once again another lovely blog full of help and meaning
ReplyDeleteI loved the sound of this technique Susan. When you mentioned the tree edges being loose and soft it called to mind old time matte painters.
ReplyDeleteUsing similar techniques they would create wonderful vistas painted on sheets of glass for special effects shots in films.
Susan, thanks for sharing your techniques. I've always felt a limited palette was best - you've helped confirm it.
ReplyDelete